.png?width=180&height=67&name=Crank-AMETEK-HZ-Rev%20(4).png)


Thomas Fletcher, Co-Founder and lead Storyboard product guy, walks through the ins and outs of embedded GUI testing in our Embedded GUI Expert Talks with Crank Software. By watching a replay of Thomas’ live video or by following along the transcript below, you’ll learn:
- The challenges of UI testing in embedded display products
- The importance of understanding your user
- The main UI testing techniques and testing processes
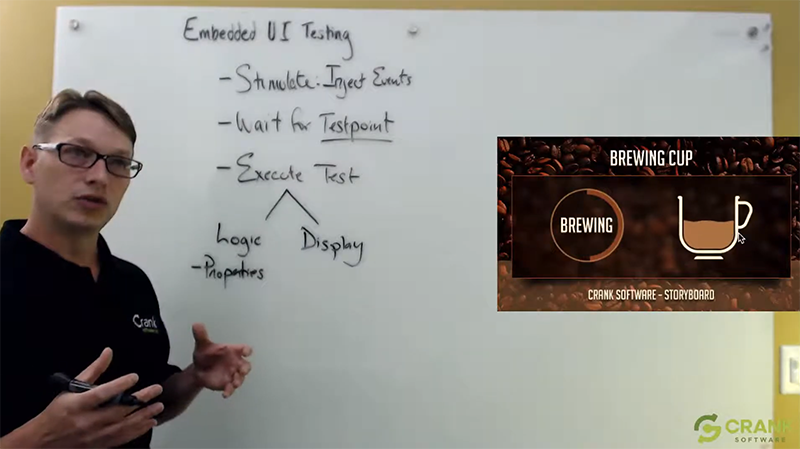
Embedded GUI testing is not your average test
This is a big topic because GUI testing is a bit different than your average test activity. It involves a lot of the same steps, but it has a lot of challenges to think about when you and your product development team get into the process of testing your user interface.
What makes embedded GUI testing interesting is the nature of what it is being tested. I'm putting up a little video to run on the side and will refer to that as we're going along.
One of the challenges with GUI testing is that it's not your typical environment in terms of a procedural environment where I can make a call, it provides me the input, and then I get a response. It's a much more interactive, fluid environment. That being said, we want to consider what it takes to execute a GUI test program and then think about what is it that we need from our framework.
Driving a user interface during GUI testing: Be the user
The very first thing we're going to do is to pretend to be the user in order to drive a user interface for testing. You can see here that there's some clicking going on. We’re working our way through different screens at different modalities - navigation. So, the very first thing we need is a way to stimulate the user interface. We need to do an injection of user events. (I'll use the term event generically). It may not actually be a true event, rather a way to capture an event stream of user interaction or used to programmatically generate that event stream. Once I have the ability to stimulate the GUI, the next step is not necessarily a function call. I can make the function call and get the return value, but user interfaces are more dynamic and complicated than that.
Oftentimes, stimulation will take some time to propagate its way through the processing system of the user interface or the GUI graphics package that you're working with. The next step is really important: We want to wait for our testpoint.
Waiting for your testpoint
I'm going to highlight here that this is a testpoint because it's not necessarily the case that the minute you inject an event or stimulate the user interface with data that you're going to be working with a testable system. If you look at what's going on right now, we have animations that are rolling through and we have feedback from the GUI to the user in a dynamic manner. That's very difficult and challenging to test because the GUI elements are constantly in motion, so being able to wait for this testpoint is something that's really important.
It's something that you need to rely on in your graphics framework, for example Storyboard, to be able to give you that goal point. When this event or situation occurs, we can begin our GUI testing.
Executing GUI testing in your embedded product
Finally, we're at the point where we can execute our tests. What does this mean in a code-centric world? We’ll be validating certain characteristics, whether it's the output from the function or some of its side effects, and validating those environmental situations against the input.
I triggered an input. I waited for a testpoint. And now at this testpoint, I expect a certain environment, model, or presentation. In the embedded GUI world, we can branch this test into two different categories: The logic type of test and the display type of test.
When you’re testing the logic properties, you’re testing the properties of your scene. You’re testing whether or not a button was depressed or released; whether or not an object is in the right place; whether or not something is made visible; and this is all at an embedded GUI testing property level.
Reminder: There are two types of embedded GUI testing: the logic type and the display type.
So now I'm looking at my visual scene (all of the visual objects or properties that are in your display). I’m looking at their X, their Y, their position, their size, and where they sit relative to one another. This is probably the closest relationship to standard functional testing where we're just comparing values, but considering the challenges in a user interface, we also have to look at the presentation.
Logic and display GUI testing = property and pixel GUI testing
In the display scenario, we're looking at how the end results come together. What is the presentation to the user? Because ultimately, we’re testing the user interface experience. It's not just about whether the logic of the operation corresponding to your input got executed, but whether the presentation works.
Let's walk through a scenario and talk about how we'd address some of these challenges.
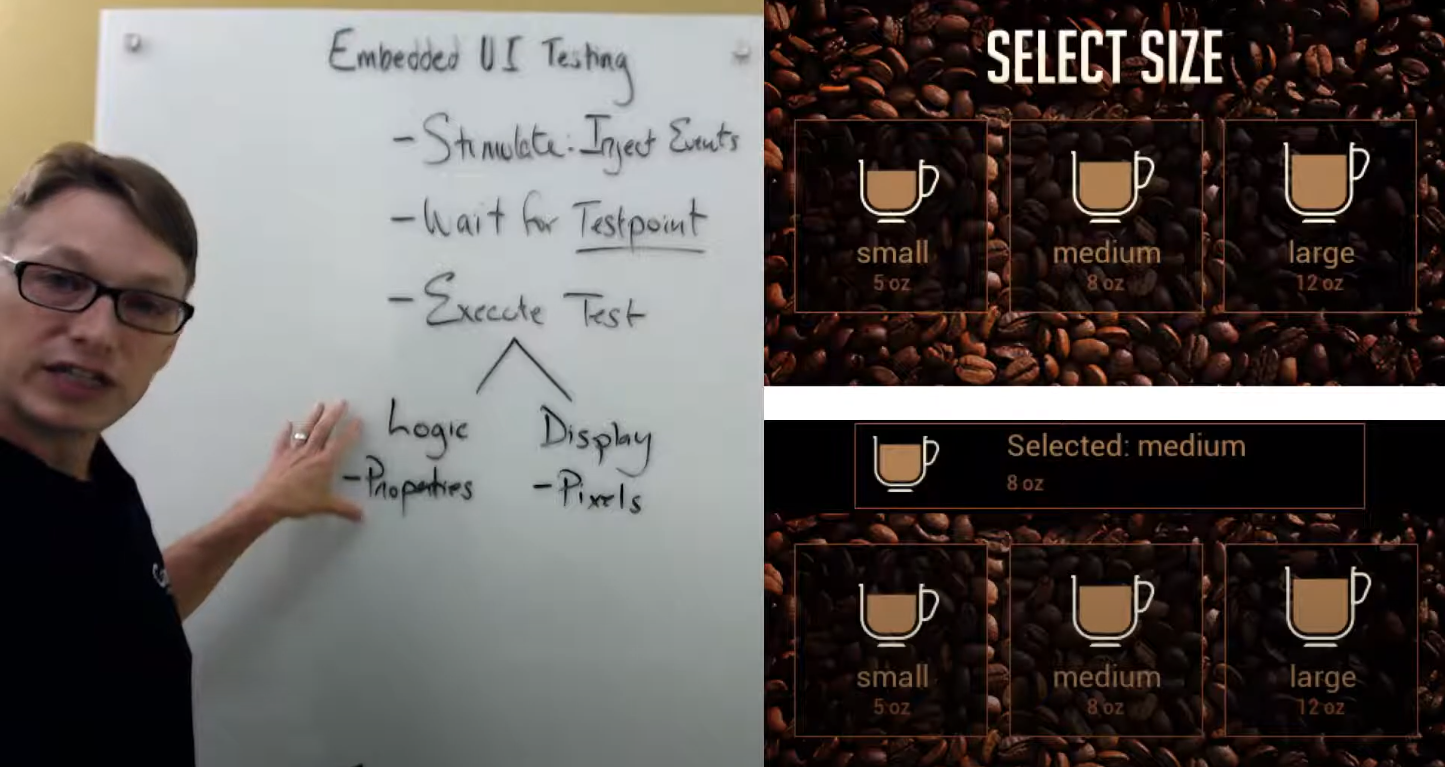
Our coffee application is running a couple of animations. We'd like to add new functionality, build it up, and test it. So what does that look like? When I select the size of my coffee, I'd like to give the user some feedback. I'd like to pop up a layer and let the user know their selection as a soft confirmation. This is a workflow.
If we were just looking at logic testing, the scenario would be relatively clear. I'd like to push the button. That's my injection. I'd like to wait for the testpoint and the GUI to react to that. And when the user interface is reactive, then I would like to validate that this pop up is now visible to the user. This is what that testpoint might actually result in. Here, we can start seeing the difference between logic and display in terms of some of the challenges of UI testing.
Using the logic technique: GUI testing for visibility
Everything I just said in my logic test was true. The pop up is visible, but is it visible in the right way? No, because it's sitting in the wrong object stack when I compare it to the other objects in my visual scene. This is the challenge. We can make some adjustments and compensate for that in our logic scenario. We'll just test to say, is it visible? Is it on top?
We can extend our test case some more. Our tests are passing, but still not presenting in the way we'd like it to because we want the bar in our embedded user interface to not to be in the middle of the screen, but to actually cover up the “select size” and replace that statement. I now need to add one more condition into this logic scenario. You can see here how one simple test scenario starts “blooming” in terms of the number of criteria I need to put in when logic testing.
When push comes to shove, this is the scenario that we wanted to test. We wanted to make sure that it was visible, correctly positioned, and placed in a way that was relative to all of the other content on the screen. Now, if I think about how much effort went into that logic test, that could be pretty complicated because the scene would be very large. The nature of the relationship among everything else could be very complicated.
Take a screenshot of your embedded GUI display
This is where we now compliment our logic testing with display testing. Take a screenshot or snapshot of your embedded GUI display to actually validate the content we're looking at. Is this content reflective of the content that I'm desiring? That is a simpler test because we're just going to look at the final GUI display composition.
We don't need to look at the entire scene. We can just look at the composition of the pixels. What's the difference between these two displays? They look visually identical. From my perspective, looking at this as a visual tech, they look identical. But if I were doing display testing, I would have to think about the criteria that I'm using to actually measure any differences.
Comparing embedded GUI displays
They aren't identical. The top one has an opaque bar and the bottom one actually reflects the true desired behavior, to see the background with a little bit of transparency.
It's difficult to see in this dark scene, but rest assured it's there. How do I know that? Well, if I were to look at this situation of capturing the display and comparing the display against my desired outcomes, some sort of golden masters of what those embedded displays would look like, here's what I would end up with.
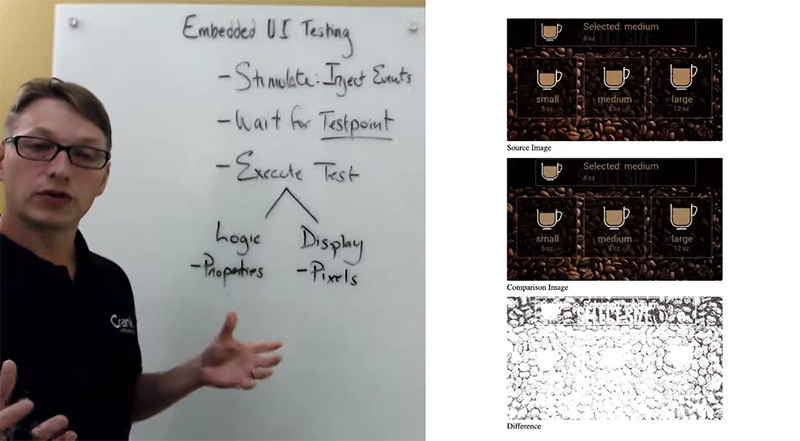
I would end up with a visual difference that shows me this intersection of how the two displays are different from one another at a pixel level. Just like logic testing has its own challenges in terms of scope and how many properties you're going to be evaluating for a particular input change, we have the same challenge with display testing.
With display testing, there's a lot of different rendering technologies. In fact, we're seeing three different presentations where the bottom two were rendered by different types of technologies. The top one was OpenGL technology and the bottom one is software rendering technology. Visually, they appear to be the same. At this point, we can't just ask ourselves if the pixels are identical because we may have different testing environments. Testing could occur at a desktop level and on your embedded GUI product, you could have a variety of different products that are showing the same display, but using different processing technology to render that display. The real challenge here is how do we actually get the display content to show me sort of a pass/fail result, the same way we test logic properties.
Examples of GUI display testing techniques
I'm going to switch over to a web browser here to give you a little insight into what we do for this type of testing scenario inside Storyboard. Storyboard uses both logic testing and display testing techniques to ensure that we have a situation where all of our rendering technologies are comparable and give product development teams the same type of result - regardless of the operating system, the CPU, or the GPU.
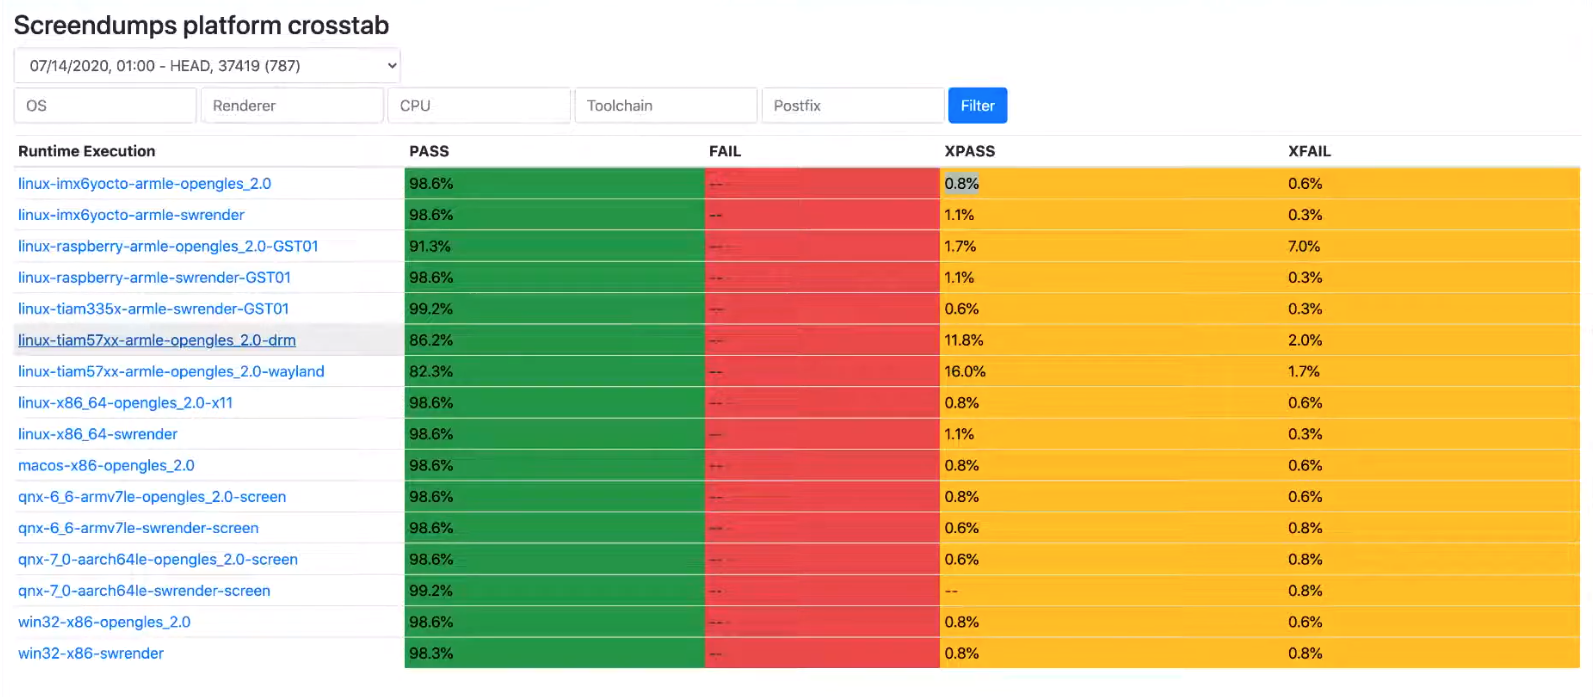
Here you’ll see the variety of different platforms that we're executing. This is what we call screen dumps, our GUI display capture test framework. For each one of these platforms, we run a series of individual tests that look at various visual scenarios. The tests evaluate them not just on a pixel by pixel basis, but using a few different metrics to evaluate the visual scene that's being presented.
You can see those here as our SSIM which stands for structural similarity measurement and then hist which is a histogram measurement. These are two different numerical analysis techniques that run over the image, both on our golden image as well as our new target image, and then compared. This is where some of the nuance comes in because we’re not looking at it the same way as looking at the pixel by pixel comparison. Visually you can see that these two results look identical. Even if you zoomed right in, you'd have a hard time seeing that there was a difference between them, but mathematically, you know there is. The difference is caused by floating points or small rounding differences that in this case, are taking those gradient values and turning them into slightly different alpha values.
SSIM or structural similarity measurement: quantifies image quality degradation caused by processing such as data compression or by losses in data transmission.
The difference might be a value of 1 or between the value of 240 and 239, but it is a visual difference. To compensate for the difference between technologies, we can use the SSIM and histogram values as a benchmark, and then put them into ranges. This is the same sort of technique that you can use within your own embedded user interfaces.
Let's go back to our scene now
Now looking at everything we’ve discussed so far, you can see that GUI testing can get very complex. What's important is that GUI testing isn’t really about taking one path or another. It's a matter of combining both techniques to your maximum advantage in order to ensure that the areas of your embedded product can be tested and validated at a display level (in terms of what's being presented to the user) and at a logic level.
Tip: To compensate for the difference between technologies, we can use the SSIM and histogram values as a benchmark, and then put them into ranges.
Injecting events capability in your UI graphics framework
For this, what you're looking for in terms of the higher support package from your UI graphics framework is the ability to inject events. You want to quickly record an interaction model and then play that interaction model back. We call that capture playback within our Storyboard context—being able to inject events as if you were a user, looking at the execution of that input, waiting for a particular testpoint, and being able to do that at arms length from the embedded user interface.
Tip: UI testing isn’t about choosing one path. It's a matter of combining both techniques to ensure that your embedded product can be tested and validated both at a display level and logic level.
Can I wait for my data to be processed and wait for a certain situation to be reached within the user interface, where it's stable for me to start executing some logic tests or sharpshooting displays? These are really macro level operations. When we talk about the display technique, we're talking about capturing the pixels and then running some post-processing to compare against something—the same way our logic tests would be comparing against expected values. The difference here is that expected values are going to be another pixel display. It will be another image file that you're going to be comparing against, and then using your different analysis techniques (the structural similarity and histogram technique), in addition to the per pixel comparison. You’ll use those techniques together to give you some sense of passing or failing your testing and validation.
Live Q&A on GUI testing for embedded products
When it comes to testing, do you recommend an automatic or manual testing process when it comes to testing in embedded GUIs?
Answer: Ultimately, you will probably always have some aspect of manual testing. One of the challenges of the embedded GUI environment is the nature of what you can automate and what you can't automate, and what resources you have available to you. Ideally during the product development phase, you're always looking to add automation because testing the embedded user interface is not a scalable activity if you're just simply clicking and moving, and clicking and moving.
There's no substitute for user testing, but if you have an event injection system that allows you to capture playback, play it back quickly then slowly. You can model a lot of different user interactions as long as you've got the ability to wait for sensible testpoints to do that evaluation.
If everything is time-based, it's really hard to get the timing since it's so fragile. This fragility is one of the challenges of embedded user interface testing. In general, when we talk about user interfaces, they are typically very fluid. For example, the visual content of just changing color is going to break your display testing. You're potentially changing the interaction model. Maybe you have a button and the button isn’t big enough—that might break your logic testing if you're looking at the size of the object properties.
 Another challenge is staying on top of your test masters, or your test results that you're comparing against, and being able to draw that back to understand the UI is changing faster than you can keep tests up to date. That's a problem. So, automation is the way to go. You want to look for a UI graphics framework that allows you to build on that automation.
I hope this session gave you some insight around embedded GUI testing, the challenges involved, and some of the GUI testing techniques that we can use together. It’s crucial to go back to your GUI display, consider the richness of the user interface, consider the amount of movement, and the ongoing animations you're using to draw people in.
It's a significant challenge to test user interfaces for your embedded products, so understanding the resources that are available at your disposal in terms of tools to make that testing effective is super helpful.
For more Embedded GUI Expert Talks like this one, check out our YouTube playlist for on-demand videos and upcoming live dates. If you're interested in this topic check out this Advanced User Training Webinar — How Decoupling Communication Between Your User Interface and System Logic Can Lead to Improved UI Development.