If you haven’t heard the term hybrid rendering before, that’s because it’s pretty new. Broadly speaking, hybrid rendering generates graphics by using multiple distinct paths through silicon. One example is creating CGI movie frames using both a GPU and a CPU however, we at Crank use the term for something that is much more useful for embedded developers and designers: rendering a user interface with multiple graphics accelerators.
If this feat seems intriguing or even confusing – read on.
In the embedded domain, hybrid rendering means creating a user interface with both a 3D GPU and a secondary graphics processor within the same application. The secondary graphics processor must be able to accelerate 2D graphics (this is typically a composition core but other options are possible). The application dynamically switches between accelerators at run-time, depending on what graphics need to be displayed.
An example of silicon with the right magic is the NXP 7ULP which has both an Open GL ES GPU as well as a 2D GPU accelerator/compositor. The 2D GPU is very powerful and can accelerate alpha blending, scaling, rotation/mirroring, overlays, lines, rectangles, color space conversion, and more, with much less power consumption than its 3D GPU equivalents.
Achieve dramatic power savings
You can do all of your drawing with an appropriate 3D setup, and using both the 3D and 2D engines adds complexity to the software. So why bother? The answer is easy: dramatic power savings. Using the 3D GPU comes at a cost – it draws a lot of current that can make or break a battery-driven application. But making your application exclusively 2D limits the expressiveness and the potential use cases of your product. Hybrid rendering gives you the best of both worlds – the richness of 3D when you need it and the power-sipping temperament of 2D when you don’t.
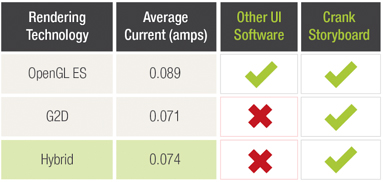
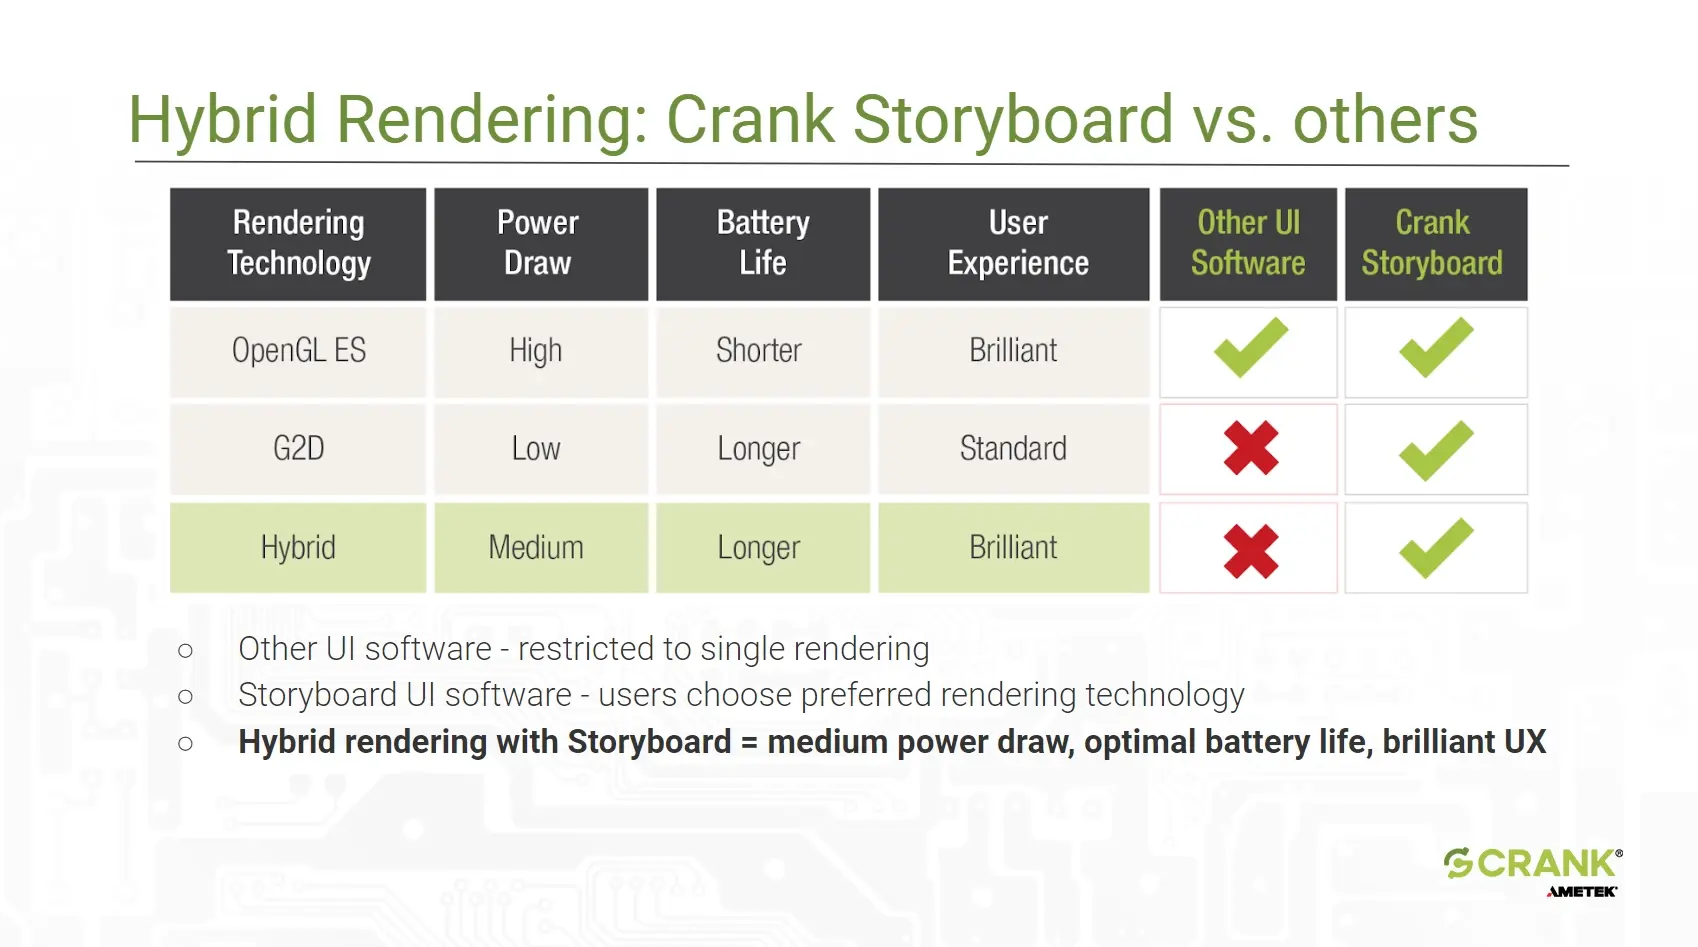
If you’re curious about the difference hybrid rendering can make, the engineers at NXP measured the current draw from our reference fitness application when it was in the 3D menu system as well as during the 2D charting portions. As can be seen in the following tables, they found that Storyboard's unique hybrid rendering tool took on average 0.074 amps - a medium amount of power draw, with a much longer batter life and an increasingly brilliant, high-resolution user experience when interacting with either the 3D or 2D graphics.

Hybrid rendering really isn't complex
Deploying hybrid rendering in a standard graphical framework requires breaking the app into discrete chunks: those that handle 3D, those that draw in 2D only, and a master compositor/launcher that knows which components to invoke using which graphical system, how and when to manipulate the hardware, and of course coordinating it all to appear seamless from the user’s perspective. So you might be worried – and rightly so – about the complexity needed in your application architecture to pull off this battery-saving trick.
Thankfully it’s very simple with Crank Storyboard because Storyboard’s rendering engine knows if the user interface screen contains 2D or 3D and automatically renders content on the fly using the most appropriate GPU. This means you don’t need to rearchitect or refactor your code to take advantage of hybrid rendering – you just run it.
Note: GPU selection is done on a frame-by-frame basis. That means the Storyboard engine won’t use both GPUs when there is mix of 2D and 3D content on the same frame. (To use both GPUs may be technically possible on some hardware, but this would insert significant synchronization complexity while negating any possible power advantage.) If Storyboard finds any 3D content on the user interface screen, it renders the entire frame using the 3D accelerator (high power use), otherwise it renders the content using the 2D GPU (low power use).
In order to make the most of a power-saving hybrid rendered application, you’ll need to use 3D within your UI thoughtfully. Keep the bulk of the application in 2D to maximize battery life and add 3D only where needed to distinguish or differentiate a feature. Don’t add 3D to permanently on-screen areas like sidebars or status bars. If your 3D graphics are static, consider displaying them with pre-rendered 2D bitmaps. Of course, animating your models can give them a huge amount of life so import 3D models into Storyboard from tools like Blender, Maya, or 3D Studio to punch up the graphics quotient wherever it makes sense – just be careful how much you add if you also have to be battery conscious.
When it makes sense to leverage hybrid rendering for IoT and wearable UX development projects
With IoT and wearable devices proliferating, maybe the better question is where doesn’t hybrid rendering make sense. We see use cases in a huge number of places:
- Wearables: Smart watches, sports/fitness trackers, smart fabrics
- Healthcare: Patient monitoring, mobile healthcare, telehealth products
- Industry: Building automation, battery-powered scanners and printers, IoT edge devices
- Smart Home: Smart home hubs, smart light switches, security cams, small appliances
- Automobiles: Electric vehicles, off-grid RVs, marine navigation
Storyboard puts user interface designers in the driver’s seat
We’re big advocates of elevating the role of the UI designer, and hybrid rendering is a perfect use case. That’s because the decision about whether your embedded application takes advantage of the power savings that hybrid rendering provides is completely in the hands of your UI designer. In other words, your designers may actually have more control over your power budget in this instance than your engineers. The reason is that your UI designers will decide if, when, and where 3D is appropriate for your app, and that will make a big difference in your device’s battery life.
Interested to learn more?
- Download the Storyboard demo image for the NXP 7ULP here.
- Read up on all the other benefits of hybrid rendering in our recent blog post.
- Watch the hybrid rendering on-demand webinar we did with NXP. We discussed and gave a demo of hybrid rendering, and how it works on the i.MX 7ULP.
.png?width=180&height=67&name=Crank-AMETEK-HZ-Rev%20(4).png)


