.png?width=180&height=67&name=Crank-AMETEK-HZ-Rev%20(4).png)

It's common for one to be confused about the difference between UI and UX design. User experience design is really about the holistic process used to drive research and design decisions, in order to better match end user needs and expectations. UI design, is in the design programs, creating the wonderful, modern that are appeasing to the eye, with all its animations and haptic feedback loops provided to deliver the intended end user experience. It's integral that they work in lock-step with one another if the end user experience to be provided is one that will keep winning and keeping existing customers.
It's not surprising then to hear that the elements of user experience design and principles equally apply for embedded GUI and user interface design.
To that effect, we teamed up with Crank services partner and UX design experts Fresh Consulting, to provide some advice for our UI and UX design community currently working on graphics projects, but specifically for embedded devices. In this two part series, learn the 5 steps to a holistic UX design process, techniques for developing UX personas, and see how the UX design process can be applied in reality - with a case study review of the UX design process behind a touchscreen restaurant menu.
Rather watch the video than read? Click here to download and stream the video of this presentation, 'Designing for optimal UX on embedded HMI systems'.
UX design defined - and why your team should invest
Sometimes we'll get the question, why should we invest in UX design? Usually this is in a situation where a client has an idea of what they want to build, they want to just hand it off to development and start building. But, the fast and bold reason to invest in UX design is that sometimes your product may not even make it to market. If it gets abandoned during the development process, a lot of technical debt is created. We’re talking about the fact that 50% of programmers time during projects is actually spent doing avoidable re-work (according to usability.gov). And that ultimately causes the user experience to suffer. When there’s a poor user experience, the effects include decreased sales, dissatisfied customers, poor ratings and reviews and that is going to negatively impact the brand - and product. It could also increase the need for training.
Definition of UX Design: The holistic process of using research to drive design decisions that match user needs and expectations
Creating a touchscreen UI for a restaurant including style guide [case study]
To better understand the process of creating a good user experience, let’s break down a recent Fresh Consulting project where the challenge was to design touchscreen user interfaces for four unique restaurant products, as well as create a style guide for the client’s future products.
The main intent of the project is to unify the product in order to reduce the need for training. If the client were to have a couple of the products in the restaurant and are interacting with one, they could walk over to the next one and it'll have a similar look and feel. Interactions will be similar enough that they could get up and running with little to no training. The other big intent of this project was to reduce the time designing and developing future products.
What is the UX design process?
Rather than reinventing the wheel every time you or a client has a new product, having some design style guides and pre-designed components to work from really speeds up the job - and that’s where the UX design process comes in handy.
According to Fresh Consulting, the UX design process has 5 steps:
- Research
- Define
- Ideate
- Prototype
- Test
Step #1: Research
So where did we start with the restaurant touchscreen UIs?
The answer, no matter the product, is always with research.
We always do some level of research as it really helps you define the product roadmap based on facts instead of opinions. This better prepares you to confront what we call “the beast of conflicting opinions”, also known as B.O.C.O. If you've ever been in a meeting where opinions are clashing and the loudest voice in the room takes over, then you know exactly what I'm talking about. Research helps facilitate a more productive fact-based conversation so that you and your client or your team, can move forward in agreement based on facts rather than the loudest voice and their opinion.
Crafting the research process to the client and project
To begin the research process, you want to understand the business needs as far as the research.
- What are the business and project goals?
- Where’s the current state?
- What's the competitive landscape?
- What's the technology constraint that we're looking at?
- Are there any timeline constraints?
That brings us to the first Fresh UX principle. Every time we build our research process, we build it around the timeline, the budgets, and the ROI. We craft our process to the client and to the project as no two are really alike.
One of the tools to do this, especially with existing products, is a UX Review where you look at the product in 10 different categories. Then you give the product a rating based on your analysis. This aligns the teams on areas that need improvement and it tells you where to focus team efforts to get the best ROI out of the product.
The UX Review Framework --> Look at the product in 10 different categories, give the product a rating based on analysis, and focus team efforts to get the best ROI out of the product.
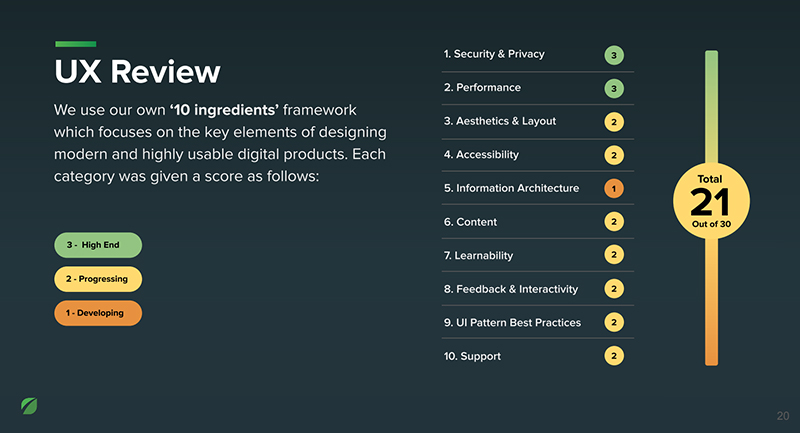 Photo courtesy of Fresh Consulting
Then, the other half of research is empathizing with the user and understanding their point of view. We want to define who the people are that are using the product and how are they using it. Personas are the tool of choice.
- What are their key touch points?
- What are their tasks?
- What are their pain points around those tasks?
- What are key influences?
Using user personas in UX research
Personas align teams on who we're designing for and create empathy for who the users are and the high-level problems they're facing on a daily basis.
In this touchscreen UI project, we boiled it down to four main user types. Settings Sophia and Two-Click Nick.
Settings Sofia is the restaurant manager or owner who needs to get into the touchscreen UI product and manipulate the settings - or even cook with it. We found that solving her problems trickled down to our other users.
Two-Click Nick is your typical line cook, a teenager or twenty something that's just come on to the job. He gets thrown into the kitchen staff mix and the crew has no time to train him. Keeping those two in mind, we're able to solve the problems for the remaining personas too.
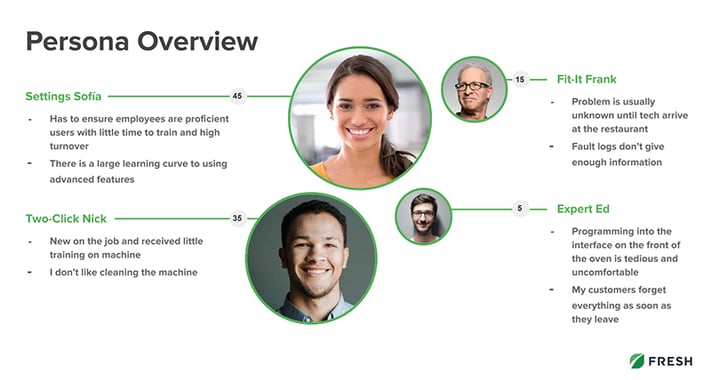
Photo courtesy of Fresh Consulting
The trick with user research is to observe them. Don't just ask what they do. You should observe what they do - because if you just ask what they do, they're going to give you a textbook answer. A textbook answer means missing a lot of the details of what they really do. So, when you start to observe, you start to see where they really struggle, where they might not have mentioned if you just ask them. You might see some little workarounds that they created because of a problem with the existing product, but they're just used to doing it and accepting that comfortable experience. This is where the gems of creating a better user experience come from - user observation.
Step #2: Define
With user observation, we like to define what the problems are and prioritize them.- What are the user's needs?
- How frequent is that need?
- How does it impact them?
- How does it impact the business?
In order to understand, one of the tools we use is user stories.
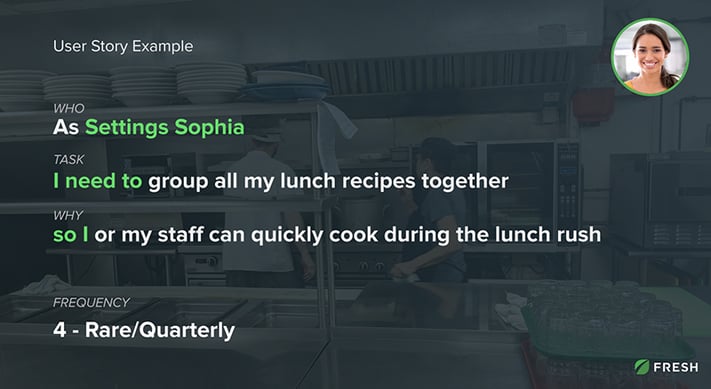 Photo courtesy of Fresh Consulting
Building on your user stories
User stories drive the user flows that we design for and answer the questions we asked above. A user story might look like something like the examples shown above.
For Settings Sofia, she needs to group all of her lunch recipes together so herself or her staff can quickly cook during the lunch rush. This is really just organizing the machine for her presets. It's not done very often but it's super important because it affects 2-Click Nick, who uses it to cook a lunch sub quickly in order to fulfill a customer order in a timely manner. This scenario often occurs multiple times a day. When it comes to design, we want to make sure the product button is prominent, easy to find, and easy to click for Settings Sophia, because it’s something she's rarely done. It could be a much smaller button and as long as it's in an intuitive location, then it should be fine as far as the design hierarchy.
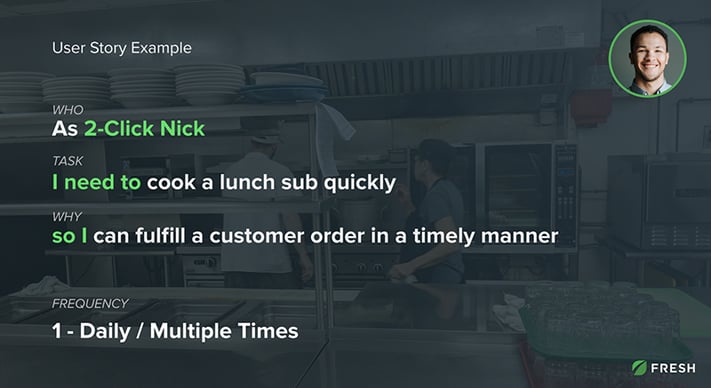 Photo courtesy of Fresh Consulting
Step #3: Ideate
After we've defined user problems and prioritized, we want to get into ideation mode. This is where we're working with project stakeholders and our own design team. We work through information architecture including site flows, wireframing, and even moving to mockups. We use another tool called Invent Value. It's super valuable for both your team and stakeholders.
Stage 1
Stage 1 is used for ideation and extremely helpful, especially right now during the challenging times of COVID-19. Stage 1 is all done remotely - you can do it in person as well, but it is really built for being remote. Stakeholders and design team members just post their ideas, and no one else can see them at this point. The advantage here is that you don't get group think, and you don't get the loudest voice in the room taking over. Everyone can just freely post their brilliant ideas.
Stage 2
Stage 2 is where the brilliant ideas get revealed. Team members and stakeholders can see them. Stage 2 is where we encourage discussions around the ideation, give praise, ask questions, and develop the ideas into something bigger.
Stage 3
The last stage of Invent Value is where everyone gets a certain, chosen amount of votes they can cast - voting on one idea or spreading them across multiple ideas. Stage 3 is where you see the best ideas rising to the top, where you can then create action items off of those popular ones. This method is a really good way to push out a lot of ideas, get people involved, and get better buy in as the project moves forward because of the many passionate individuals involved.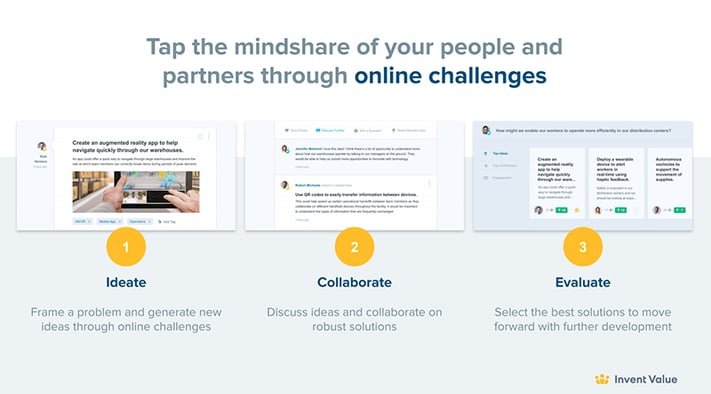 Photo courtesy of Fresh Consulting
Moving to sketches and wireframes
Another fun part of the UX design ideation process is sketching and wireframing. We might be on a white board, maybe at a cafeteria table (pre-Coronavirus of course), and our industrial designers are even efficient sketching on paper. A lot of times, we'll complete this part in digital format as well and just put together very rough sketches focused on content and functionality. The main reason is just because it’s faster - faster than doing mockups and coding, and you just want to get the idea out there. You don't want to be worried about the colors, fonts or the imagery at this point. It's all about the content and the flow of this speedy stage.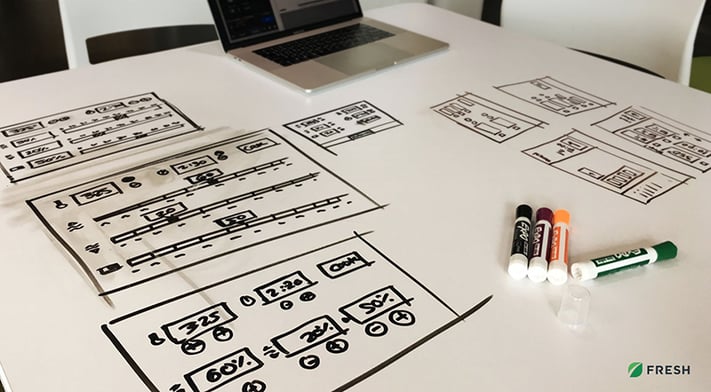 Photo courtesy of Fresh Consulting
Step #4: Prototype
You don't want to just imagine your ideas from the ideation stage. You want to prototype it and get it in front of the people who care. Once you start to solidify your designs, you want to make sure you're following best practices. In Part 2 of this "Hello World" for Embedded UI and UX Designers blog series, we will go through them in detail. Can't wait? Watch the full video here now.
Step #5: Test
After creating one or several prototypes, test, test, test. Usability testing and task time tests are typically what we're looking at. Impression tests and A/B tests are more about quick hit brand impressions. The reason you test is because most designers don't get it right the first time. You design and test it, then learn from those failures.
During the testing part of the process, you create insights that help create a better product. Because of this, you want to begin testing early, but also throughout the other life cycles (wireframing, mockup and prototyping stages). Before your team moves to the development process and builds, it’s usually a good rule of thumb to test with users.
A little bit of usability testing goes a long way
Some people think usability testing means getting 20 people that really know what they’re doing to test. That's not quite true. A little bit of usability testing goes a long way.
The industry standard is really to test 5 users, because you could double that and go up to 10.
But you really don't gain that many more insights. You’d be doubling your budget but not really getting the ROI from those tests. Testing 5 users from a single persona or a couple of personas that have the same flow, is usually enough.
In our usability testing, we tested 4 products. The total number of test users across these 4 products, covering the personas, ended up being 27 users. Our results were that we had a +3 bump in usability score improvements. We shaved off up to 74 seconds on a few of the tasks. We also bumped up our NPS impressions by 2 points. And then along the way, we discovered issues that needed to be fixed. Our client knew we had improved their products to a certain point - but then we improved it that much more by doing user testing.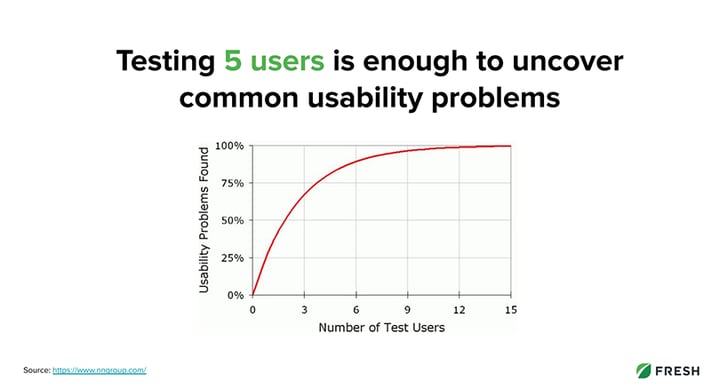 Photo courtesy of Fresh Consulting
Shipping UX designs over to the embedded UI experts - with confidence
Successfully completing the UX design process allows us to deliver the UX designs to platforms like Crank's Storyboard HMI design platform with confidence, knowing that their development team isn’t going to be wasting their time building something that's way off the mark. This means more time being put into building the embedded touchscreen UI product and then even testing it on the actual prototype before going to market.
Considering the development handoff during planning or including the developers in periodic check-ins allows all teams involved to check functionalities, as it may impact the development efforts while creating something that may be unique in the design. Using consistent naming conventions for files and having a style guide as your reference for components and colors will also help to create that consistency across current and future products.
Quick tips to keep in mind during development
To wrap up, keep your desires involved as you get into development. Sometimes you have to quickly pivot and maybe do something a little different than the original design called out for. Having some open collaboration from time to time can really help with that design process for both designs and developers working away on the project.
We’ll leave you with one last principle and that is design is a process - not a singular event. Through both the design and development processes, keep an open mind to design adjustments and encourage strong collaboration on the journey towards creating a better product by the end of it all.
Read part two of this blog series, covering touchscreen UI best practices, UX design, and designer/developer handoff, or jump straight to the full presentation and watch on-demand here now.